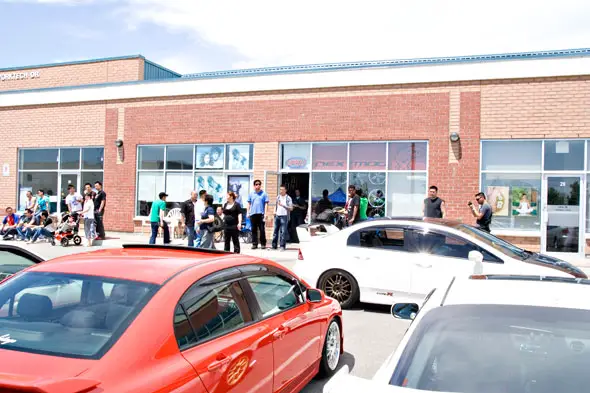
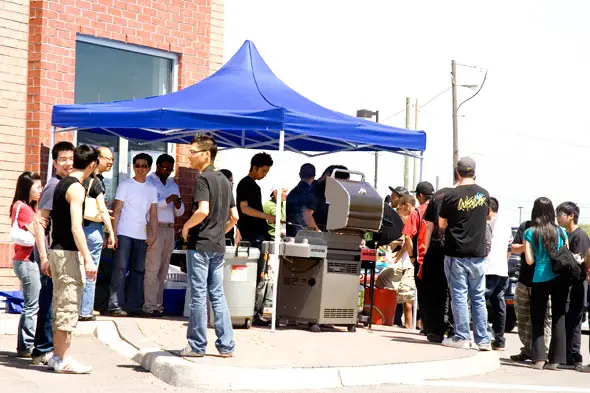
Nextmod’s one year anniversary BBQ went off without a hitch yesterday, even though the weather threatened like it was going to pour for most of the event.
Nextmods customer base speaks to the type of service they provide as the amount of quality cars that rolled through really rivaled some of the full blown car shows this year.
Shout out to Peter and the crew for organizing the event and keeping us all fed and hydrated for free!
Today’s coverage includes: random stuff, Mazda, Subaru, Hyundai, Toyota, and Honda/Acuras. Check back tomorrow for Mazda, Mercedes Benz, Lexus and Infiniti rides.
Random stuff
I think last years Nextmod meet was the reason I started taking pictures of random stuff to begin with.
Peter was busy working all dayMr Ing in the foreground drives a sick Lexus on CCW'S which you will see tomorrowEmbrace itHaha Mr. Sparkle.My lunch for today, probably.Another variation of the turbo lag sticker
So wandering around we saw this place that had ‘Pure Natural Chinese Herbal Medicine Steam Cabins’ I dunno what the heck these things did (compact sauna?) but we all had a good laugh about how odd it all seemed.
The ad on the door that made me stop and investigate.So you sit in there and get steamed to look younger?
Subarus, Hyundais,Toyotas, and Kias
Team JH!You don't really see too many people doing anything with FortesScraped Crusaders and Stance Is Everything collaboration!Pearly's STI, do wantAndrew's Genesis has been getting all sorts of press lately. Deserved
Hondas and Acuras
I think this car had been parked in a time capsule for the past few yearsSince I have not seen a car styled like this in some time and it was really cleanOne of 2 Acura clipped hatches that dayNextmod shop truckBoosted AcuraClean s2kI waited awhile for this shotThis was bossThis is still one of my favorite Honda's everJust beautifulNice looking Civic with a Mugen Acura lurking in the backgroundClean, authentic.This is quickly becoming a favorite of mine as wellThe team at Nextmod did a great job on this oneThis car looks 100% different than the last time I saw itVery, very unique wheel set upFit.Turbo DC5 and the man behind Stretch & PokeCloser look at that Turbo RSXI saw this NSX my first time at APH, it's serious And this is why
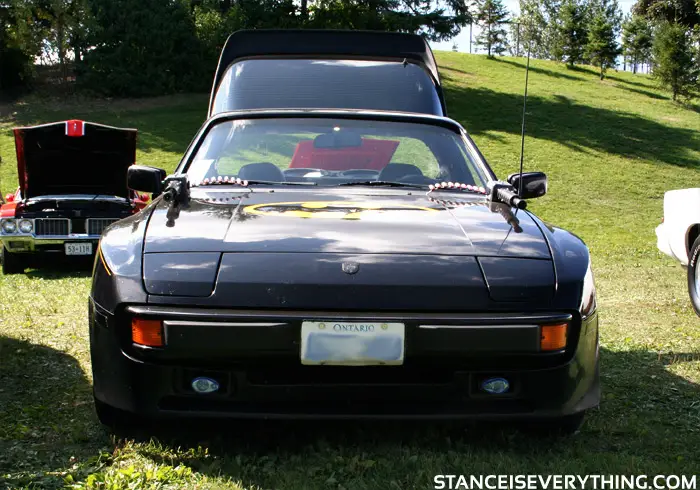
It would appear that I was wrong as the owner continued work on his Porsche by adding a few more details to the mix, most notably the winged flares.
Last Year
Last years look for the GTA’s Batmobile
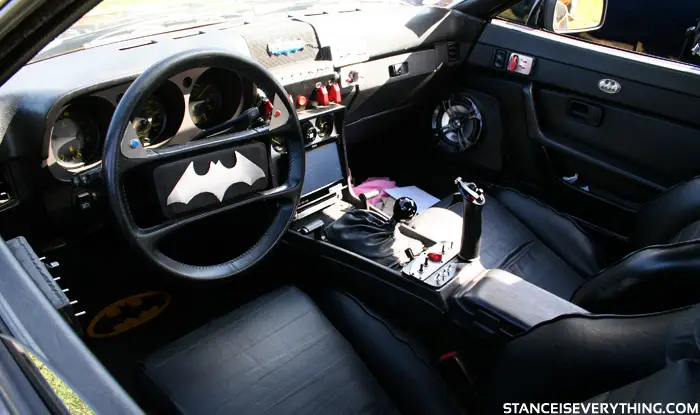
Pretty tame at this point really, minus the gunsThis could have use a Turbonique Jet motorThe interior before re model
This year
Quite a number of additions this year
New flare, new wheels and new door detailsYou know you have to respect his follow through with an idea if nothing elseThis is a project of heartI want to know how he drives around with this legally in Ontario
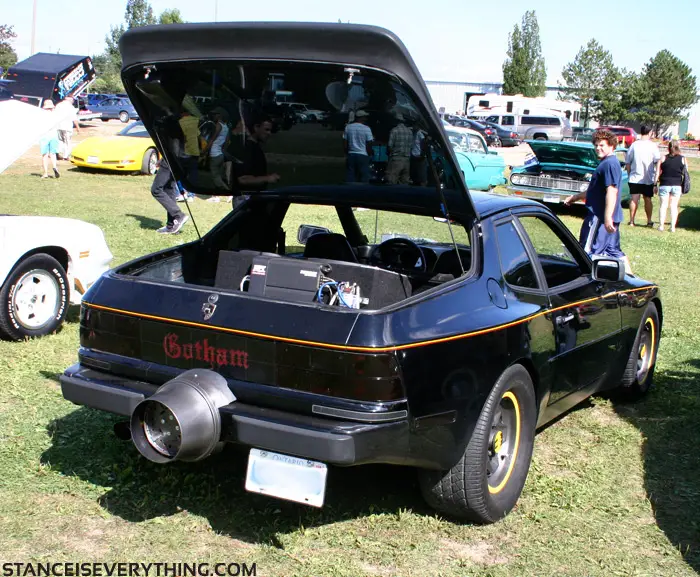
The ultimate attention getter Custom 85 Porsche Batmobile.
This car gets pictures taken everywhere you go even while your driving.
-2.5 litre 5 spd with new solid center clutch.
-Tranny serviced and new shift linkage.
-Custom Yellow and black seats , factory yellow and black gauges, Clarion 200 watt flip out dvd Mtx 600 watt amp, twin 12″ mtx thunder, 6.5″ and 6 x 9 mtx.
-American Racing wheels 15 x 7 and 15 x 10, Mickey Thompson N50-15 (345/50) rears.
-Nos sniper system is new and never used.
-Twin .223 machine guns (replicas) that light up on the hood.
-GOTHAM lights up on the rear panel of the car.
-Fenders are not complete and need to be glassed.
I am out of time and have another project that needs to be started. Will sacrifice it for $6500.00 NO TRADES, AS IS you finish. Requires no etest.
Text only at xxx-xxx-xxxx or email me with a number and we can discuss all issues or concerns.
Sorry no test pilots and dreamers. For the couple of clowns with negative comments, grow balls and send me your email. I will meet you and your car at any cruise anytime.
Site Updates
Got a few events I am hitting up this weekend. The first is 100% no car related but has to do with a good friend of mine so I am plugging it.
The first is a comedy show put on by contributing photographer/laugh provider Keven Soldo and a few other funny guys:
Wiggin’ Out Comedy Show
The Comedy Bar
945 Bloor Street
Toronto, ON
August 14th (Tomorrow!) 10pm-12am More Info
and the second thing I will be attending is the Next Mod 1 Year Anniversary which I mentioned in this weeks event preview.
Note since I will have all my sticker stock on me I will be putting everything temporarily sold out on Sunday just so I don’t over sell my stock.
Sunday evening everything that is not sold out will be back on sale.
Flashback Friday
Not sure why but I was thinking about this Civic the other day. I love the fact that it’s so subtlety done and so fast.
I’ve had these two hatches on my hard drive for awhile now and even though they are from complete opposite ends of the spectrum modification wise I decided to post them together.
Now if I could only remember where I found them…
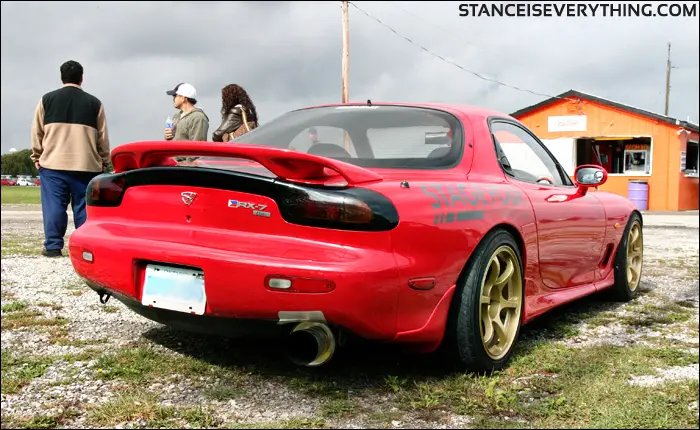
323 GTX's are so badass. I suppose the distant predecessor of the speed 3?I've seen these double K wheels on a few cars and for whatever reason I like this application most
Speaking of Hatch Life has anyone heard from Noah? Come back to the autoblogsphere my friend the internet needs you!
I remember the first time I was on a message board and saw someone speak highly of a Ford Escort, I thought they were crazy, until they posted a picture.
It was then I realized that for whatever reason the North American market really got the shaft when it came to Escorts.
We could have got something cool.
Damn proper looking Ford, love the boxy flaresTuckin tire, draggin flap this car is serious
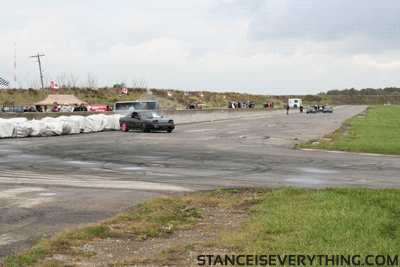
I had a great time last year because not only was it my first time at Cayuga but it was also my first time seeing a legal drift event. I’m looking forward to attending again this year and taking in the drag racing, drifting, time attack, and lapping events in addition to the diverse show and shine.
Additionally the show is sponsored by a number of local shops and companies in the area including Next Mod and Advance Powerhouse which are the two shops that helped me get my suspension dialed in this year.
I like cars, this info is not new to any of you, I also really like to ride BMX and if for whatever reason I had to pick between the two I would probably chose the latter.
However, I don’t see having to choose anytime soon so I have decided for this Theme Tuesday to combine my two interests and post cars owned by fellow riders.
Most of these have been found on bmx message board but a few have been found on car message board with bmx threads.
Last time I posted this car I had no idea it was a BMXers ride
Pontiac Fiero
This bikeguide member has one of the cleanest Fieros I have ever seen, these cars rarely show up on message boards anymore
Probably the cleanest Fiero I've seenThats lots of dish
Minitrucks
A lot of BMX riders are minitruckers as well, suicide doors was started by a BMXer who used to work at Dans competion.
Matt's a local and we used to shred the hell out of our local park togetherLove this truckMini project by a fellow s10forum/bikeguide member
Honda’s
Honda’s are cheap and reliable exactly what we need to get from spot to spot.
This Civic is super clean and the photography is top notchSame civic different kicksOne of the cleanest bodied and styled tegs I have seen in awhileThe same car on rpf1s (I'm jealous)
VW’s
VW’s are popular with everyone why not riders?
Rider from the UK with a LupoThat sky looks evilStraight to the pointGreat looking murdered golfDurks car is legit
Drifters
The BMX mentality lends itself quite well to drifting…
DorrriiiLogans Legacy is well known for good reason it's very uniquePuuuurrrrpppleFlushGettin looseReal loose
If you ride and read this blog and I didn’t post your car this time around don’t worry. I already have half of a part 2 started.
Feel free to email me at [email protected] you want to make sure I include you in the next one
Local tuner shop, and Stance Is Everything sponsor, Nextmod is having it’s one year anniversary meet this Sunday August 15th from 1pm – 5pm.
Every meet at Nextmod is sure to be packed with vehicular eye candy since the crew at the shop always provides free drinks and BBQ’d food for those in attendance and if there is one way to get people to come out it’s with free food.
There will also be a live DJ on site spinning the wheels of steel and as an added bonus there will also be a special discount on all products ordered or purchased on Sunday.
I still don't know what this says, hahThe Next Mod store front pre signageFree BBQProper 350I have not see this Fit since that meet, wonder if it is still aroundOne of my favorite local speed 3s
Last year there were over 400 cars so if you are local come out and let’s make this meet even better.
If it’s not obvious Stance Is Everything will be at this event.
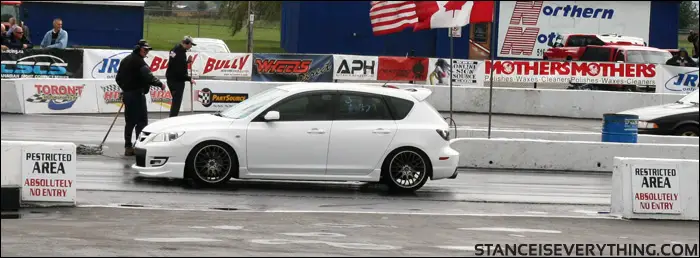
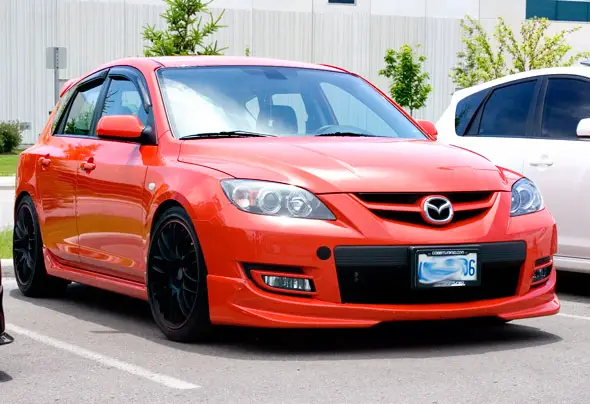
sumTHAIguy on Mazda 3 forums has always had a pretty low speed3, and he’s gone through a number of wheels since I first started paying attention to his ride. Recently he changed both his front suspension setup and wheels and in my eyes really dialed in his stance.
Using the same smaller lock rings and cartridges from BC that I am he added a custom shorter spring up front (4″ vs 6.7″) to the mix and his now able to tuck tire on his Work Ryver DT4’s.
The result is his car now looks epic.
As soon as I saw this pic I was floored by how good it lookedNot much is getting under that bumperWith 18x8.5 +25 and 18x9/5 +30 he does his fair share of rubbingOfftopic: That roof reminds me of the high school from Tony Hawks Pro Skater 1HAI
When you ride low, no matter how careful you are things are going to: hit the ground, get scraped, get dented, dinged and otherwise damaged. Most of these things happen away from prying eyes (oil pans, frame rails, sub-frames, cats, mufflers, etc) but every once and awhile a visible piece like a lip or side skirt to feel the pain.
Having these things repaired professionally time after time, can get quite expensive so a lot of us end up having a go at fixing the damage ourselves. Repairs like these are a great way to get your hands dirty in regards to body work since there is little to no risk of making the problem worse.
The Problem
Shortly after putting on my replica fiberglass Garage Vary lip for the season I brain dumped and ran it into a sharp/steep ramp of an unfamiliar underground parking lot.
It sucked, and I was pissed but I had repaired the lip last year after some road debris jumped out at it so I knew that there was nothing stopping me from doing it again.
Supplies
The most important part when taking on any project is making sure that you have all the necessary supplies BEFORE you start, nothing sucks more than getting part way through and realizing you don’t have something you need.
Fiberglass
Fiberglass is what does the bulk of the structural repair you can use mat or cloth, and I currently have both in my garage but for his application I used fiberglass mat.
Fiberglass mat is pretty easy to use, you tear/cut it into portions you need, mix the resin and hardener together, and then apply the resin/hardener mix to the damaged area via a brush.
Once the repaired area is saturated you then brush the mat to get it saturated as well then apply the mat to the damaged area using a stippling technique.
The cloth works in essentially the same way but you cut rather than tear.
A fiberglass repair kit, like the one below, will have everything you need.
Here is a shot of my well used supplies which are outlined above and below
Body Fillers
Body filler takes care of the cosmetic portion of this requires using three different levels of fillers: Short strand fiberglass filler (‘kitty hair’), plastic filler (your typical bondo), and spot filler (fast drying filler).
Short strand fiberglass filler
Short strand fiberglass filler is two part (filler and hardener) product that is the hardest and strongest of all of the fillers used in this repair, all of the fillers used after this are appearance level fillers and are not as strong, rigid or durable as fiberglass filler.
Plastic Filler
The second type of filler used will be plastic filler, generally when people refer to ‘Bondo’ this is the type of filler they are talking about. Similar to fiberglass filler this a filler/hardener combo but it does not contain any fiberglass and is therefor easier to sand but offers less structural support.
If you repair cracks with only this type of filler there is a good chance it will crack and fall out later.
Spot putty
The final type of filler used in this project is “spot” filler. It’s pre-mixed filler than provides little to no structural support but is great for filling small imperfections, pinholes and stone chips. It sands out very easily, provided you let it dry completely first.
It also comes in a UV version that will dry faster if you leave it in the sun.
In regards to brands of filler, I currently use ‘Bondo brand’ because it’s what Canadian Tire stocks and had I bought a bunch of it from a previous project (for my e30) so I still had quite a bit left over.
However it is considered relatively low grade and a lot of guys won’t touch it so if you can find Ever coat pick some up.
Sanding Materials
You will need the following grades of automotive sand paper to do a good job:
80,100, 180, 220, 320 (Initial sanding, Fiberglass filler, Plastic Filler, spot putty)
400, 600, 800 (Spot putty, primer coats leading to color)
To do an exceptional job you will also need:
1000-2000 and rubbing compound (Removing runs, dust, orange peel)
Note: Color sanding always seems to bite me in the ass (spray paint is easy to sand through) so I take special care to avoid runs and try and lay the paint as smooth as possible so I can avoid this step.
A sanding block is highly recommended as not only does it make the sanding even it makes it much easier to do.
Paint
You will need at least 3 different types of paint for this type of job: Sandable primer, High-build primer, Primer sealer (if working with metal), base/clear mix (this is what I had) or base and clear in different cans, or if you have on available a compressor, paint gun, and proper automotive paint.
I get all of my paint material from Cawthra Automotive since they have a wide variety of automotive supplies and will mix rattle cans to your paint code. I have received the odd bad paint can from them but most of the time the results have been good.
From what I understand NAPA also mixes paint in cans for you but none of the locations withing 30 minutes of me do so.
Base/clear, Sandable primer, high build primer
Misc supplies
Additional things that you will need for this project are: mask, safety goggles, a sanding block, a tack cloth, and a trigger for the spray can if you feel necessary (can really help when using standard spray cans).
Assessing the damage
After assembling all the materials and supplies above it’s time to get down to work and the first thing to do is assess what you are working with.
This is my lip prior to the repairs, the damage is located in the left bottom cornerHere is a close up of the damage untouched, on first glance it does not look too bad.
The first step in the repair is to remove the paint chips, cracked filler, etc to really see what kind of damage you are working with, first glances can often be deceiving when doing this kind of repair.
Once I sanded out the damage I could see just how extensive it was and that it was repaired before, thankfully there was no loose fiberShining a light on the area from the front and looking from the rear it you can really see how much of the top layer was compromisedThe circled area shows where the fiberglass was weakened on the backside of the lip
It was easy to tell that the front needed to be repaired but, after careful evaluation, I also chose to do the job right and repair the back as well so that the lip would have some of it’s structural integrity restored.
Once you have assessed your damage read the instructions on how to use your materials before proceeding, not knowing how to mix fillers correctly just leads to more wait time and a longer process over all.
After sanding the damaged and surrounding area with 80 grit sandpaper I applied the short strand fiberglass fillerOnce that was dry I then cut/ripped some the fiberglass mat for the rear repairI test fit my pieces making sure they covered the crack(s) adequately on both sidesI then fiber glassed the layers (4 in all) into place
Once you are satisfied that the area is structurally sound you can begin the long process of completing the finishing work to the visual area of the lip.
Be warned there is lots, and lots, of sanding ahead.
I brought the fiberglass filler down quickly with an 80 grit sanding disc attached to a drillNext I worked my way up to 100 grit while I manually blocked it downHere you can see the marks left from the 100 grit paper and the areas the short strand has now filled, the rest need plastic fillerPlastic filler applied to the repair areaOnce the plastic filler is sanded out using 180 grit out you will notice that there are pinholes that need to be filled with spot fillerLay the spot filler on every where that looks like it needs it, this stuff sands through easy so don't be shyHere is what the area should look like after sanding the spot filler with 220 grit sand paper, it's ready for an early primer guide coat
At this point you are ready to lay your initial coat of primer. I neglected to take any pictures of my priming process but here are some general best practice tips:
Make sure your cans of paint are warm
Make sure that the area you are painting in is over five degrees celsius
Wet the floor to limit the amount of dust you stir up
Cover anything you don’t want painted
Take your time
Maintain an 8-12inch distance from the object being repaired
Use a lot of light coats over one thick coat
Once the lip is primed you will begin to see lots of little imperfections which again need spot fillerIf you are unlucky this can happen, its a reaction caused by poor cleaning, the only way to fix this is sand it outHere is the reaction and another reaction spot sanded out, I had no more issues with this area after this stepI then filled in as many rock chips as I could see at this point... I had a few.Here is a terrible picture of what the spot filler and primer look like after 220 gritRepeating the prime, fill, sand process, notice a lot less chips this timeAs you can see by round 3 I have finally filled all of the imperfections
After this round I sanded the lip with 400 grit sandpaper (instead of 320) and applied some high build primer to the areas I thought needed a little bit more help.
Once the high build primer was dry I sanded once again with 400 grit sandpaper and did a final coat of primer.
Here's the high build primer over the damaged areaThe damaged area after then final coat of primer
After the final primer coat I sanded the entire lip with 600 and then 800 grit primer so that I would have the smoothest surface possible for the base coat to be applied. The goal is for the base coat to go on as smooth as a surface as you can get it.
Sanded with 800 grit sandpaperThis was my first color coat after sanding, as you can see the lip is white at this point but lacking glossAfter a few more coats you can see that the light beginning to shine off the lipAnother shot of the lip after all of the coats of paint were complete, as you can see even in low light there is glossThe finished product, as you can see the color matches, fairly well, though it still lacks the full amount of factory glossThis side shot shows that the paint is again, slightly off shade and gloss, but not all together terribleCloser shot of the matching/or lack of matching depending on how you look at itParting shot - my front end was so much higher then!
I have been driving around with this lip installed for the entire summer now and took my new drop pictures with it on. The paint and repairs have been holding up quite well considering I have kissed it on the ground more than once and put quite a few km’s on the car.
I have yet to perfect my method to the point where I can exactly match factory paint with rattle cans but I just picked up another lip which needs no repair and just paint for a steal so I should be able to try this process out again and see how much better I fair.
If you got this far hopefully you found this tutorial helpful and if you do use it to repair one of your own lips I would love to see the results.
Used to distinguish new sessions and visits. This cookie is set when the GA.js javascript library is loaded and there is no existing __utmb cookie. The cookie is updated every time data is sent to the Google Analytics server.
30 minutes after last activity
__utmc
Used only with old Urchin versions of Google Analytics and not with GA.js. Was used to distinguish between new sessions and visits at the end of a session.
End of session (browser)
__utmz
Contains information about the traffic source or campaign that directed user to the website. The cookie is set when the GA.js javascript is loaded and updated when data is sent to the Google Anaytics server
6 months after last activity
__utmv
Contains custom information set by the web developer via the _setCustomVar method in Google Analytics. This cookie is updated every time new data is sent to the Google Analytics server.
2 years after last activity
__utmx
Used to determine whether a user is included in an A / B or Multivariate test.
18 months
_ga
ID used to identify users
2 years
_gali
Used by Google Analytics to determine which links on a page are being clicked
30 seconds
_ga_
ID used to identify users
2 years
_gid
ID used to identify users for 24 hours after last activity
24 hours
_gat
Used to monitor number of Google Analytics server requests when using Google Tag Manager
1 minute
_gac_
Contains information related to marketing campaigns of the user. These are shared with Google AdWords / Google Ads when the Google Ads and Google Analytics accounts are linked together.
90 days
__utma
ID used to identify users and sessions
2 years after last activity
__utmt
Used to monitor number of Google Analytics server requests


